How to build your firmware continuously in the cloud and sent to your devices automatically.
Project Architecture
Adding Over The Air (OTA) updates is an important factor for IoT applications to succeed. It’s a mechanism to ensure that devices are always up to date with new settings, security fixes and also adding new features to the hardware, making the customer who brought the device happy with the hardware improvements and at the same time feeling safer.
There are two important parts on an OTA architecture:
- The remote device: responsible for checking for updates, downloading the new version and applying to itself.
- The cloud server: responsible for building, distributing and managing those updates to the connected devices.
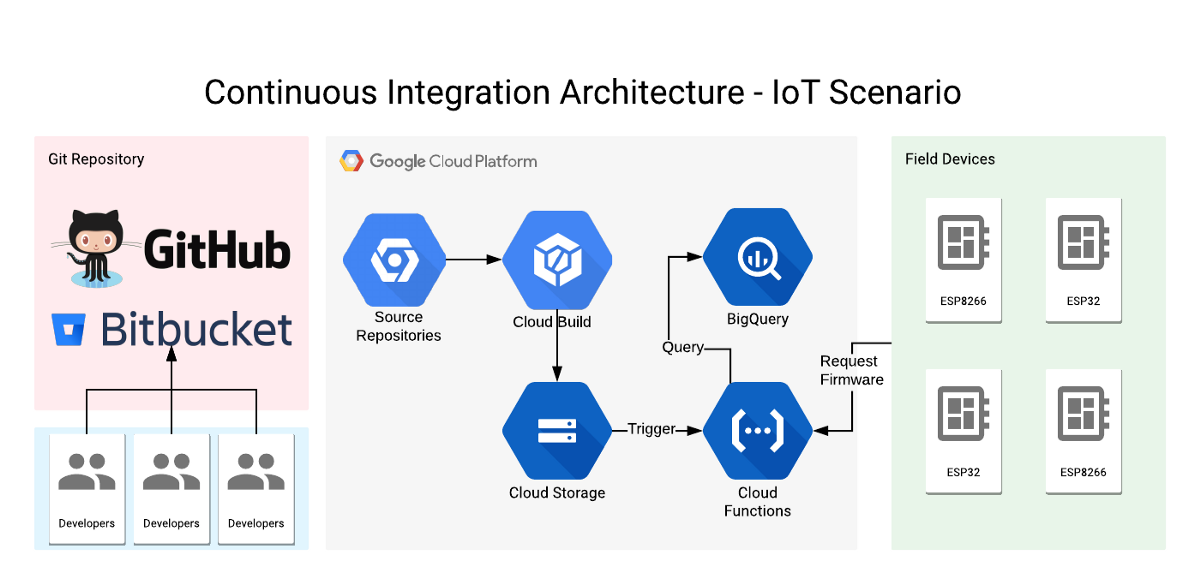
Here I’ll show how to setup an initial OTA mechanism using some Google Cloud tools, deploying the updates to ESP8266 and ESP32 board using the Arduino platform.
PlatformIO will be used for building the images, as it has a set of command line tools that enables us to automate the process of generating binary images for the devices. On Google Cloud we are going to use Google Cloud Build, that is a managed Continuous Integration environment, Google Cloud Storage for storing the binary images on the cloud and Cloud Functions to handle HTTP requests querying for current firmware versions and managing them.
Project Architecture
Getting started with PlatformIO
PlatformIO is a set of cross-platform tools for developing for embedded devices. It supports a lot of different platforms and frameworks for IoT development and also a huge set of libraries made by the community that can be easily used on your project.
I recommend installing the Visual Studio Code (VSCode) IDE and the PlatformIO plugin to get started using it. Just follow the step on the link below:
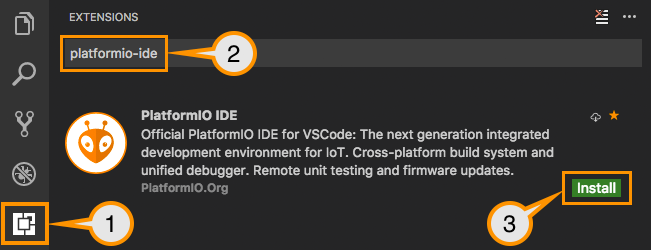
Installing PlatformIO VSCode Plugin
The code for this project is available on the following Github link. Clone or download the project the code and open it on the IDE.
The platformio.ini file contains all the configuration to build the project on the ESP32 and ESP8266 boards. Also, the project dependencies are listed here. An important configuration is the build flag VERSION, that is compiled on the project code to mark which version the device is running currently. So, every time that we create a new firmware version, this code should be bumped so the device will be able to properly check if it needs to download a new version.
The device code makes an HTTP query to the backend, sending the current version, to check if it should download a new one. Also, there is a device internal HTTP handler to display the current version. To handle Wifi connectivity, the project uses the WifiManager library, that creates an access point to setup WiFi on the device.
To deploy to the board you can use the “Build” and “Upload” buttons on PlatformIO Toolbar:
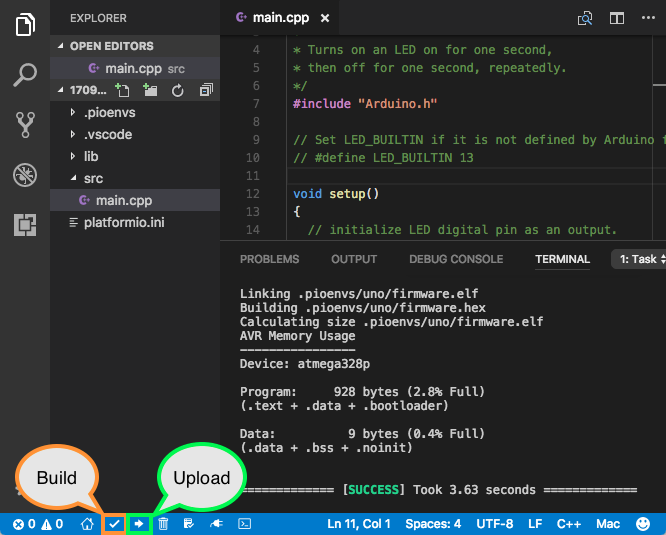
Image from PlatformIO Quick Start https://docs.platformio.org/en/latest/ide/vscode.html#id2
Setup Cloud Build and Git repositories
To get started with Google Cloud you can do all on the Cloud Console web interface, but the command line tools is a more powerful tool and we’ll need later to deploy the cloud function. To use the gcloud command line tools, follow the instructions here to download and install it.
Installing Google Cloud SDK | Cloud SDK Documentation | Google Cloud
Also after this you should authenticate and create a project to use in this tutorial, exchange YOUR_PROJECT_NAMEwith a name that you want for this project:
# Authenticate with Google Cloud:
gcloud auth login

# Create cloud project — choose your unique project name:
gcloud projects create YOUR_PROJECT_NAME

# Set current project
gcloud config set project YOUR_PROJECT_NAME
Now let’s create the Cloud Build configuration and also the Bucket to store the binaries. Follow the steps:
Cloud Build Setup:
- Open the Cloud Build page.
- Enable Cloud Build API if not enabled yet.
- Select the Triggers tab.
- Click on Create Trigger.
- Now you can select your Git repository and authenticate with your provider. I used Github.
- On the last step, Trigger Settings, let’s create a trigger by git tags.
- Name it — “Trigger by Build Tag”.
- Select Tag as the Trigger type.
- Select cloudbuild.yaml as the Build configuration type.
- Click on Create Trigger.
Cloud Storage Setup:
- Now Open the Cloud Storage page
- Select the Browser Tab.
- Click on Create bucket.
- Create a bucket with the name
YOUR_PROJECT_NAME-firmwaresand select the let the other values as the defaults. In my case, the name of the bucket wasgcloud-ota-update-firmwares. - Click on Create.
Our repository contains a cloudbuild.yaml file, that contains all the configuration to build the firmware and push to Cloud Storage. Cloud Build uses Docker for building artifacts, so I used an image that contains all the PlatformIO tools for building embedded projects using our platformio.ini file.
Now, every time that you push a new tag to your repository, it will trigger a build on Cloud Build. You can create the tag on the UI of your git provider or you can do this using the following git commands.
git tag -a v1.0.0 -m "First build"
git push -u origin --tags
And if everything is working correctly you should start seeing some builds on the History tag on Cloud Build page when you push a new tag. We’ll revisit this at the end of the post to see how to push new versions.
Deploy Cloud Functions
To control the OTA process, we basically need two things: Store firmware metadata in a database, so we can query later for the latest version and a way to check if given the current device version, check if there is the need to update the device. For achieving this I built two cloud functions:
- insertFirmwaresOnBigquery: this function is triggered when new files are uploaded to Cloud Storage. This way we store this metadata on BigQuery so we can query and filter later by device variant and firmware version.
- getDownloadUrl: this is an HTTP function, that receives the current device version and also it’s variant (in this case, esp32 or esp8266). Then it queries BigQuery for the latest version and compares the device version with the latest firmware version.
Now you will need the gcloudtool that we installed in the beginning to deploy the functions. Alter the project ID on the file deploy-prod.sh and run it to deploy both functions. On the first time, it will probably ask to enable the cloud functions API. Just confirm that and continue with the process.
./deploy-prod.sh
With this command, all the functions are deploying and reacting to events in our architecture.
Pushing a new version
To push and build a new version that can be download by the devices is simple, with just a couple of git commands we can trigger a new Continuous Integration build. So, let’s say that you add a new feature to the device, like a blink on our loop function.
Small code to add to our new firmware version.
Now to create a new release, change the version on platformio.ini file, from v1.1.0 to v1.2.0 for example, commit the changed files, tag the new commit and push all to the repository. Here are the commands:
# Commit the files
git add src/main.cpp platformio.ini
git commit -m "[feat] Add blink feature"

# Tag this commit
git tag -a v1.2.0 -m "Add blink feature"

# Send to the repository with the tags
git push -u origin master --tags
This will trigger all of our processes and when it’s all done, you can reset your device with an older version and see in the logs that it will download the new version and reset itself. If everything is right, you should start seeing you a LED blinking.
Project building and the device receiving new firmware.
Conclusion
I hope that this tutorial gave you an overview of what can be done to automate this process for achieving better IoT deployments. We went though a lot of pieces involved in an OTA deployment process, but of course, is too simple yet. We can improve by adding much more features, like :
- Release channels: Different devices check for different channels, like production, beta and alpha channels. This way we can restrict only for internal devices to receive new builds to be tested by the company and then push the version to all the customers.
- Use private keys on the device to validate if the device can receive those updates and make the whole process more secure.
- Check for updates on a time frame and provide user feedback: Users can be using the device when the update arrives, we should handle this and wait for the user confirmation to go though the update process. This way we don’t block user interaction with the device just because a new update arrived.
References:
- https://dzone.com/articles/how-to-approach-ota-updates-for-iot
- https://cloud.google.com/functions/docs/writing
- https://cloud.google.com/functions/docs/tutorials/storage
- http://docs.platformio.org/en/latest