Collecting massive amount of data, with a managed and serverless architecture so you don’t get yourself burned in the process.
Ok, there is a lot of tutorials teaching how to build a Weather Station because there many ways of doing it. It’s a simple project so I will try to focus on building an end to end solution, from collecting data to doing analytics on your data. All of it will use managed Google Cloud services, giving an overview on how to build a complete IoT solution. At the end, you could build reports on your data and access it through the web. Here you can see how it will look:
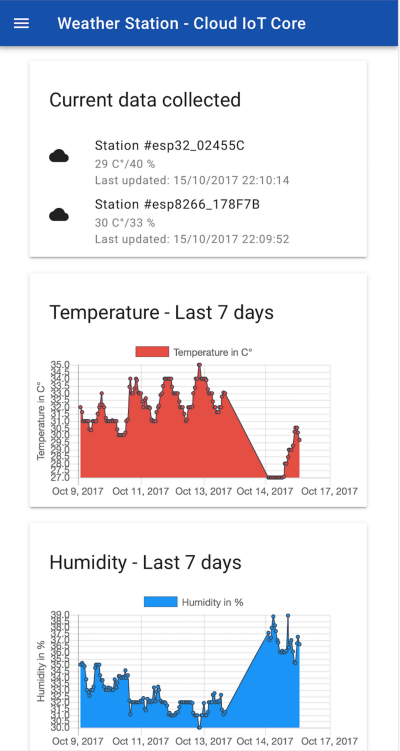
Our finished WebApp : https://weather-station-iot-170004.firebaseapp.com
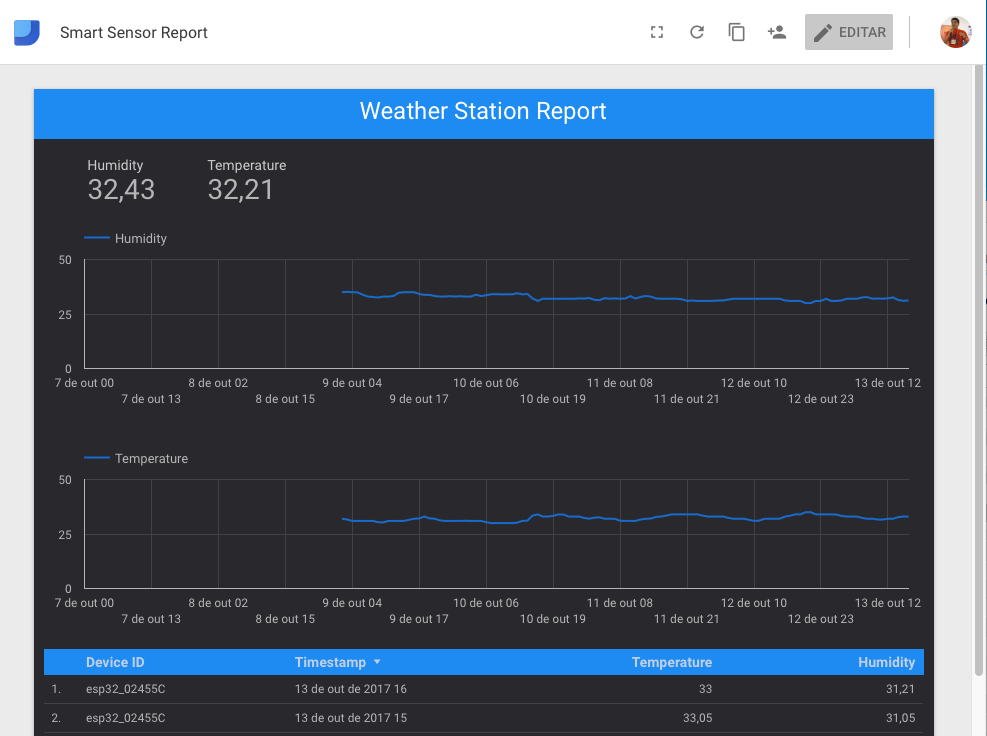
Data Studio report: https://datastudio.google.com/reporting/0B0w5dnm9bD8sdy1OR1lZQ0l4Vmc
In this tutorial we will build a weather station using a WiFi microcontroller running MongooseOS, that sends data securely via Cloud IoT Core using MQTT protocol, then the data is processed in an event-based way using Firebase Cloud Functions, that save the raw data in BigQuery and update the device current state in Firebase Realtime Database. The data then can be accessed through DataStudio and via a simple WebApp hosted on Firebase Hosting. It’s many products, but I will show how each one can be easily connected to deploy a product that scales on demand. Our architecture will look like this:
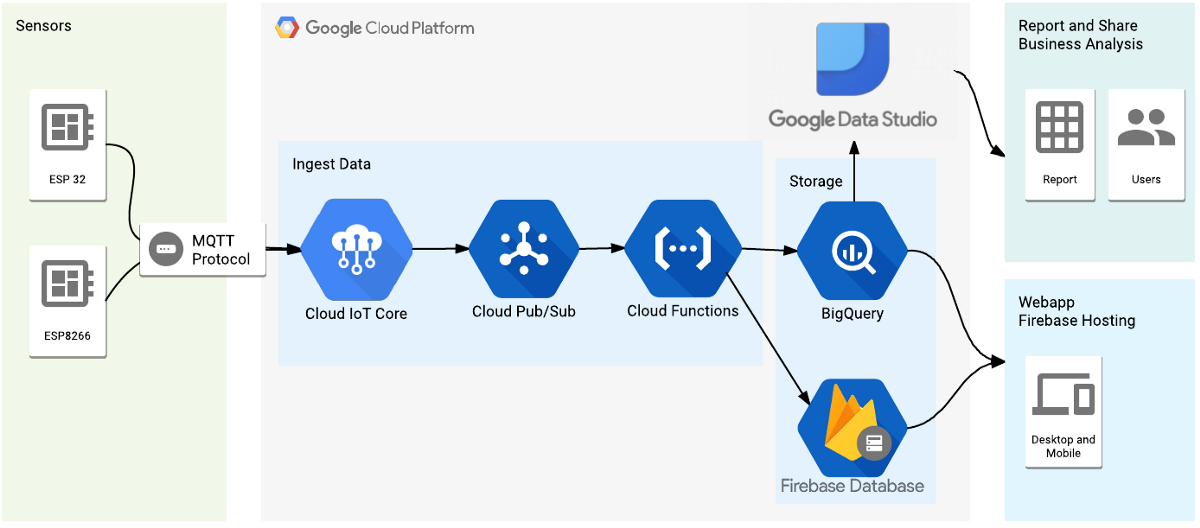
Our project architecture
For ease of development, I’ll use MongooseOS, that already have a connector for Cloud IoT Core and helps with the process of provisioning devices with certificates, WiFi configuration and others custom configurations.
What we will learn:
- Create a Cloud IoT Core registry of devices.
- Create PubSub topic to receive and send data.
- Install MongooseOS command line tools —
mos. - Program the ESP32/ESP8266 using the
mos. - Provision the device with certificates and WiFi configuration.
- Setup BigQuery and Firebase to receive the data.
- Deploy a Firebase Cloud Functions to ingest the data.
- Deploy a basic WebApp in Firebase Hosting.
- Make a report in BigQuery using Data Studio.
So enough talk, let’s get started 🚀.
Setup Google Cloud Project and Cloud IoT Core
Google recently launched in public beta Cloud IoT Core, a managed service to securely communicate with your IoT devices using common protocols (MQTT and HTTP) and to manage those devices in an easy way. Basically, with this service, you can plug with many others Google services to process, store and analyze all the data generated by your devices. Here we can see an example of a recommended architecture using Cloud IoT Core.
Data flowing through many Google services.
Cloud IoT Core have a concept of registry of devices, wherein our project we will group a series of similar devices and associate with this registry. To get started with Google Cloud you can do all on the Cloud Console web interface, but the command line tools is a more powerful tool and it’s the one that I choose to use on this project.
To use the gcloud command line tools, follow the instructions here to download and install it.
Installing Cloud SDK | Cloud SDK Documentation | Google Cloud Platform
After installing the SDK, you should install the beta tools to have access to the Cloud IoT Core commands. Also after this you should authenticate and create a project to use in this tutorial, exchange YOUR_PROJECT_NAME with a name that you want for this project:
# Install beta components:
gcloud components install beta

# Authenticate with Google Cloud:
gcloud auth login

# Create cloud project — choose your unique project name:
gcloud projects create YOUR_PROJECT_NAME

# Set current project
gcloud config set project YOUR_PROJECT_NAME
Now on the Cloud IoT Core side, you first should configure some components related to Cloud PubSub, one of the main components used by Cloud IoT Core. In the commands below you will do the following:
- Give permission to Cloud IoT Core to publish messages on PubSub.
- Create a Topic named
telemetry-topic, where those messages will be published. - Create a Subscriptions named
telemetry-subscription, that we will later use to read some messages from the Topic. - Create a Registry named
weather-station-registry, where our devices will be registered to be able to connect to Cloud IoT Core. Here we associate with the Topic created.
# Add permissions for IoT Core
gcloud projects add-iam-policy-binding YOUR_PROJECT_NAME --member=serviceAccount:cloud-iot@system.gserviceaccount.com --role=roles/pubsub.publisher

# Create PubSub topic for device data:
gcloud beta pubsub topics create telemetry-topic

# Create PubSub subscription for device data:
gcloud beta pubsub subscriptions create --topic telemetry-topic telemetry-subscription

# Create device registry:
gcloud beta iot registries create weather-station-registry --region us-central1 --event-pubsub-topic=telemetry-topic
If you access the Google Cloud Console you can validate that it’s all created and configured.

Registry created and associated with a PubSub Topic
Mongoose OS and ESP32/ESP8266
For this project I’ll be using the newest ESP32 WiFi microcontroller, for those who don’t know it yet, it’s the sucessor of the largely famous ESP8266 from ExpressIf, but now with much more capabilities, like built-in Bluetooth LE, dual-core processor clocked at 240MHz, touch sensor and support for flash encryption, so no one can get access to your code. One hell of an upgrade.
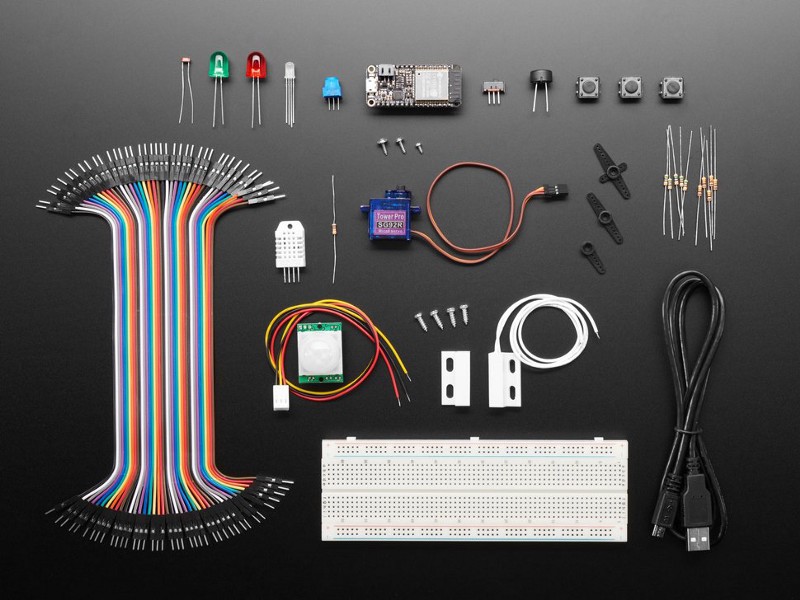
Mongoose OS & Google IoT Core Pack w/ Adafruit Feather HUZZAH32 — https://www.adafruit.com/product/3606
Adafruit sells an awesome kit to get started with the ESP32 and Google Cloud, it contains all you need for this project and many others, so if you want to go the easy way, you can buy one of this. (Just an idea for you adafruit industries, I do not have one of these, just saying …)
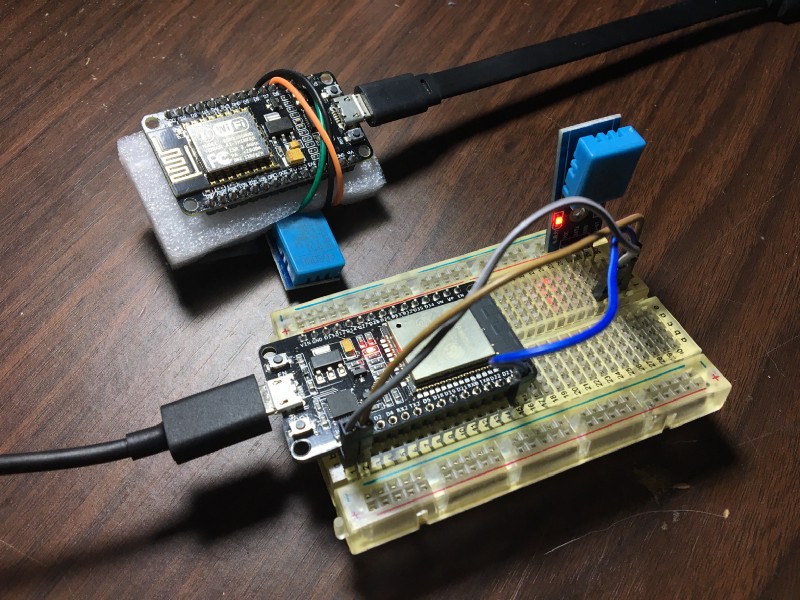
This project made with both ESP microcontrollers ESP32 and ESP8266.
This project also works on an ESP8266, so the code and schematic provided here have a configuration to run on both microcontrollers. The circuit for this project is very simple, just connect the DHT sensor to the ESP32/ESP8266 like the following diagram:
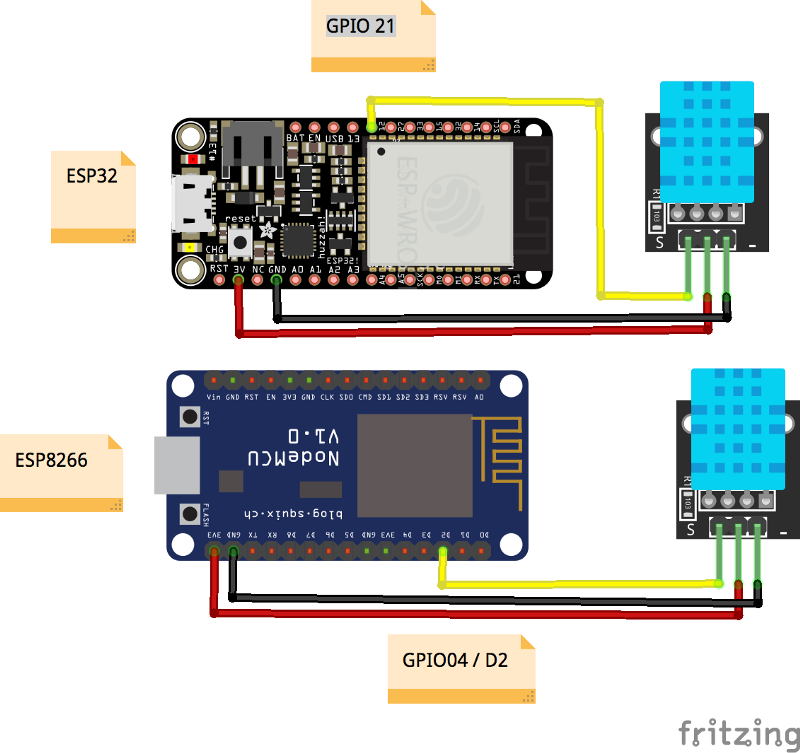
Project schematic using ESP32 and ESP8266
To program the board we will use MongooseOS, that is an Operating System with many awesome features and made for commercial products. It has support for some microcontrollers like CC3200, ESP32 and ESP8266. One cool feature of it is the possibility to quickly prototype your embedded apps using Javascript and it has a tools called mos that make programming, provisioning and configuration really easy on those supported boards.
To use it we need to download and install it from the official website. Follow the installation instructions on https://mongoose-os.com/docs/quickstart/setup.html.
Programming the hardware and setup our backend
With the tools installed, download the project code on Github repository linked here, so you can build and deploy it on the device.
The repository consists of 3 sub-projects:
- firmware: the MongooseOS project that runs on the microcontroller, that collects sensor data and sends through Cloud IoT Core
- functions: the Cloud Functions that will be deployed to on Firebase. Here we have a function that reacts to new data on PubSub then send to BigQuery and Firebase Realtime Database. There is another function that it’s basically an HTTP endpoint that query BigQuery for the last 7 days of data to be used by our WebApp.
- public: a simple WebApp that will be deployed on Firebase Hosting and it consults both our databases to show our sensors data.
Here some description of the firmware project:
- fs: Here we have our Javascript code that contains all logic to collect the data and send through MQTT in a fixed interval.
- src: Our native C code, that basic initiate the Google Cloud library, so it automatically configures our project to connect with Google MQTT server.
- mos.yml and mos_esp8266.yml: Our project configuration, here we declare our project dependencies, in this case the GCP library, DHT sensor library and mJS library, the last one adds support for Javascript embedded. Here we declared a custom config variable named
app.dht, this way we can change the DHT pin just by changing this configuration, that can be made on this file or viamostool. Also, this configuration changes between microcontrollers, adding support for both microcontrollers with the same code.
To program the hardware, enter the firmware folder and run the following instructions to flash the firmware, configure WiFi and provision the device on Cloud IoT Core:
- Run
mos build --arch esp32ormos build --arch esp8266depending on the hardware selected. This command builds the firmware of our hardware. - Run
mos flashwith the hardware connected through USB to flash the firmware. - Run
mos wifi your_ssid your_passto configure WiFi on your device. - Run the following command to register this device on Cloud IoT Code. The command generates a public and a private key to be used for the communication, put the private key on the device, send the public key to Cloud IoT core and register the device, getting the deviceId from ESP. Thanks MongooseOS ❤.
mos gcp-iot-setup --gcp-project **YOUR_PROJECT_NAME** --gcp-region us-central1 --gcp-registry **YOUR_REGISTRY**
That’s it, your device will begin to send data to Cloud IoT Core. The projects come configured to send data each minute, but you can changes this later on the fs/init.js file or you can create a custom configuration variable to change the time. I will leave this as a homework. You can see whats happening on the device using the mos console tool. You will see it trying to connect with mqtt.googleapis.com.
$ mos console Using port /dev/cu.SLAB_USBtoUART
[Oct 15 18:17:47.230] pm open,type:2 0
[Oct 15 18:17:47.234] mgos_sntp_ev SNTP reply from 192.99.2.8: time 1508102268.124028, local 15.317275, delta 1508102252.806753
[Oct 15 18:17:47.448] mgos_mqtt_ev MQTT CONNACK 4
[Oct 15 18:17:47.455] mgos_mqtt_ev MQTT Disconnect
[Oct 15 18:17:47.463] mqtt_global_reconnec MQTT connecting after 2017 ms
[Oct 15 18:17:48.167] Info: {"hum":34,"temp":30,"free_ram":35.593750,"total_ram":51.218750}
[Oct 15 18:17:49.487] mgos_mqtt_global_con MQTT connecting to mqtt.googleapis.com:8883`
To see the data on PubSub you can use gcloud command to query the subscription that we created:
$ gcloud beta pubsub subscriptions pull --auto-ack telemetry-subscription
┌───────────────────────────────────────────────────────────┬─────────────────┬─────────────────────────────────────────────────────────────────────────────────────────────────────────────────────────────────────────────────────────────────────────────────┐
│                            DATA                           │    MESSAGE_ID   │                                                                                    ATTRIBUTES                                                                                   │
├───────────────────────────────────────────────────────────┼─────────────────┼─────────────────────────────────────────────────────────────────────────────────────────────────────────────────────────────────────────────────────────────────────────────────┤
│ {"hum":35,"temp":32,"free_ram":167344,"total_ram":253928} │ 158362578982703 │ deviceId=esp32_02455C deviceNumId=2799497560622332 deviceRegistryId=weather-station-registry deviceRegistryLocation=us-central1 projectId=weather-station-iot-170004 subFolder= │
└───────────────────────────────────────────────────────────┴─────────────────┴─────────────────────────────────────────────────────────────────────────────────────────────────────────────────────────────────────────────────────────────────────────────────┘
If you see the data on the console, you can start celebrating, we are on the right path 🎉🏆.
Storing data on BigQuery
Getting directly from the official website definition:
BigQuery is Google’s low-cost, fully manageable petabyte scalable data storage service. BigQuery is stand-alone, there is no infrastructure to manage and you do not need a database administrator as it scales with your data.
Here we will use it to store all of ours collected sensor data to run some queries and to build reports later using Data Studio. To start let’s create a Dataset and a Table store our data. To do this, open the BigQuery Web UI, and follow the instructions:
- Click the down arrow icon and click on “Create new dataset”.
- Name you Dataset
weather_station_iot. - Create a Table named
raw_datawith the following fields and types:
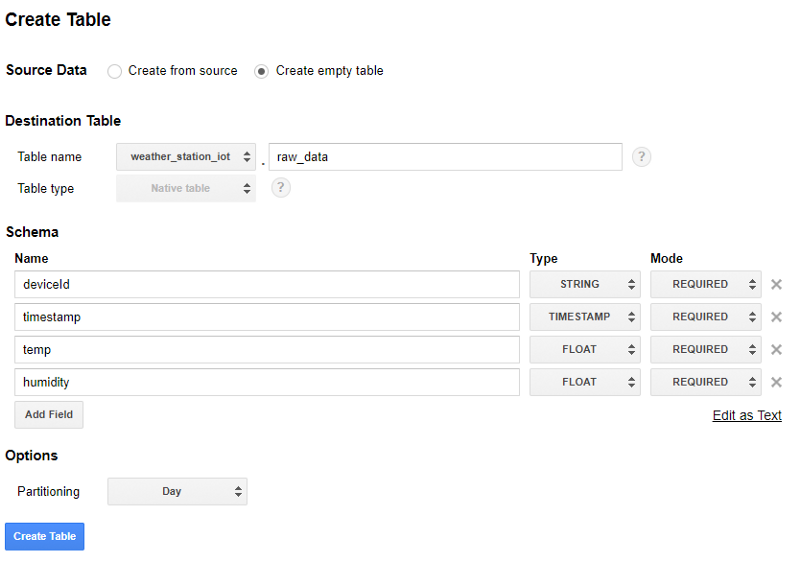
Our BigQuery table to store sensor data.
Firebase Database and Cloud Functions deploy
Now to insert data on BigQuery we will user Firebase Cloud Functions, that can be configured to execute based on many different triggers and events. One of those triggers are new data inserted on a PubSub Topic, so we will listen to our Topic associated with our Device Registry and with each data that arrives we execute a function that store the data in BigQuery and maintain the last device data on Firebase Realtime Database.
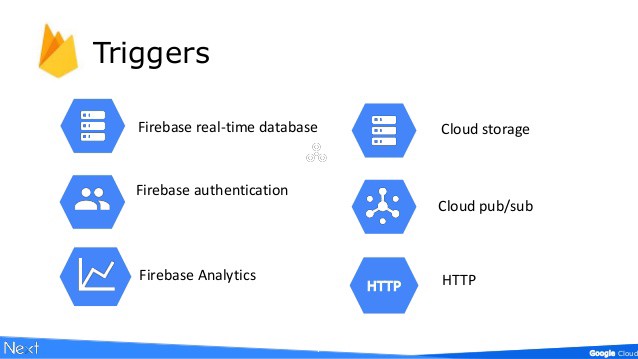
Triggers for Firebase Cloud Functions — Google Cloud Next 2017
Firebase Realtime Database is a technology really useful to maintain realtime data, giving free and automagically sync between all connected clients. Even Google recommends it to maintain realtime state from IoT devices like we can see in the here.
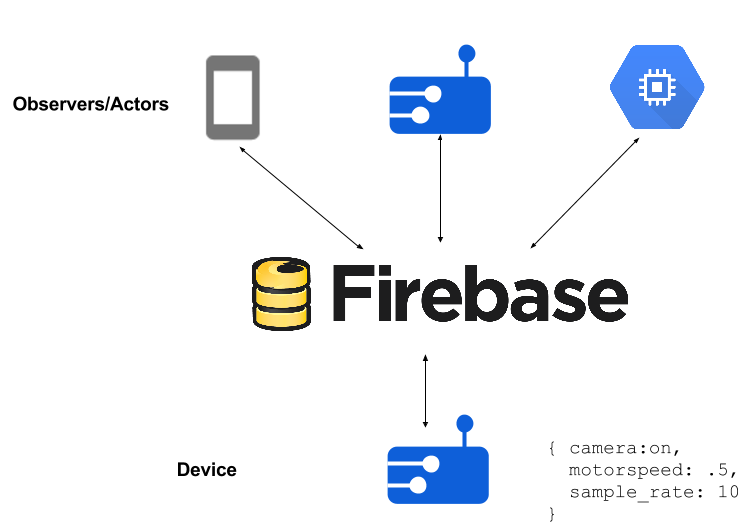
IoT Architecture using Firebase — https://cloud.google.com/solutions/iot-overview
The code for our function can be seen above, it basically react to PubSub events and insert into BigQuery then update the current state on Firebase.
The Firebase Command Line Tools requires Node.JS and npm which you can install by following the instructions on https://nodejs.org/.Installing Node.js also installs npm.
Once Node and NPM is installed, run the following command to install Firebase CLI.
npm install -g firebase-tools
Now to configure firebase with our project and deploy the functions, in the project root folder, follow the above instructions:
Run
firebase loginto authenticate with Google and setup the command line toolsRun
firebase initto associate the local project with your Firebase Project.Run the above code to set some environment variables, pointing to our BigQuery dataset and table.
firebase functions:config:set bigquery.datasetname="weather_station_iot" bigquery.tablename="raw_data"And finally run
firebase deployto deploy the Functions and the Webapp on the public folder.
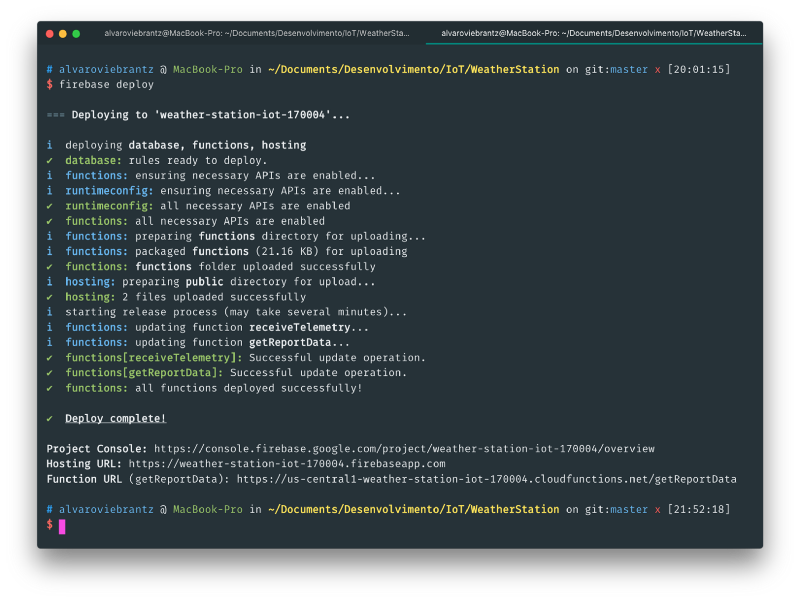
All deployed in an easy way with Firebase.
With the deployed functions you have all setup to ingest the telemetry data sent by the device and store in both storages solution. You can see all deployed resource on the Firebase Console.
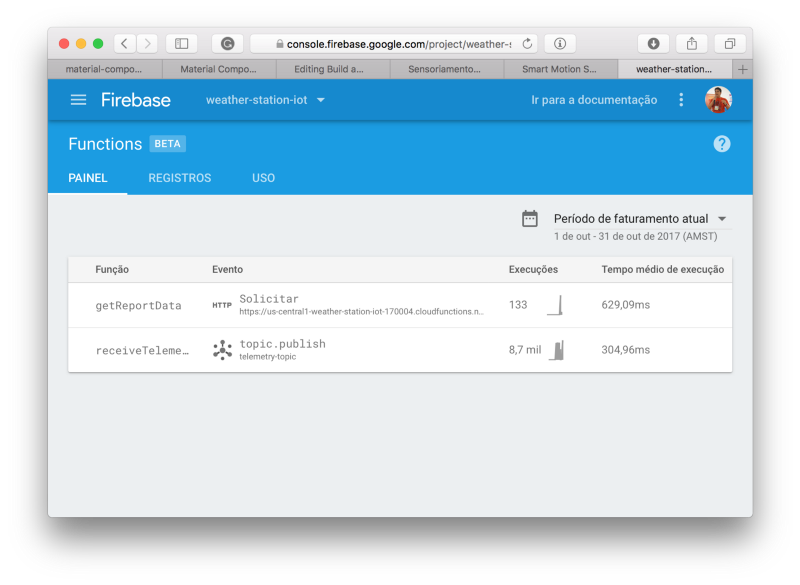
You can see executions and the logs of our functions running on Firebase.
You can see the code for the functions above:
Our Cloud Functions responsible for sending data to BigQuery and Firebase Realtime Database
The firebase-tools have also a builtin server, you can start it on the project folder just running firebase serve, it will start a web server on port 5000 by default.
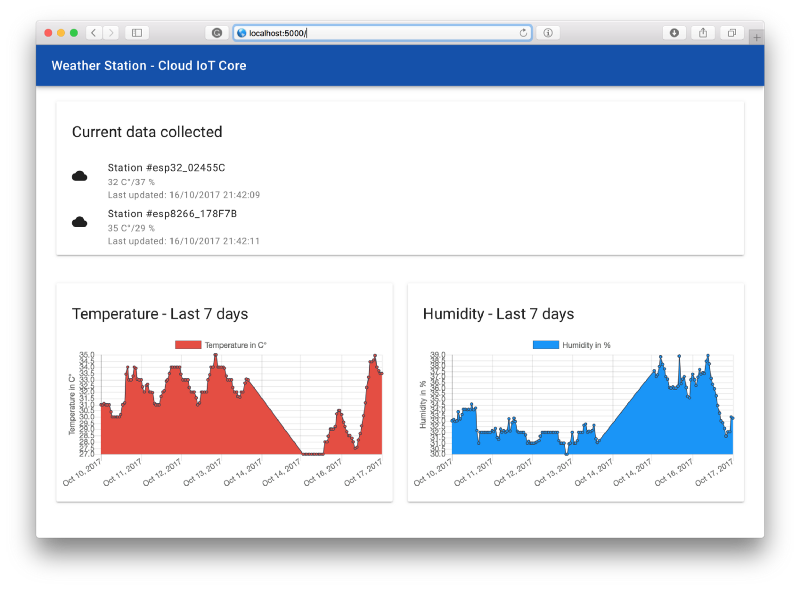
Running local using Firebase Serve
The webapp can be seen directly on the public directory, the logic is at public/app.js and the frontend at public/index.html. It’s pretty basic, just Javascript, Web Material Component and Chart.JS for the charts.
If all it’s correctly setup, then you can celebrate again, because you developed an end to end solution for IoT without touching an advanced server setup.
Last stop, Google Data Studio
Data Studio is a really intuitive tool and I will not explore it here so this tutorial became less extensive, but to let you know, Data Studio has a BigQuery connector, so just import your table and play with the different visualizations provided by this awesome tool. Go to the datastudio.google.com and play with it.
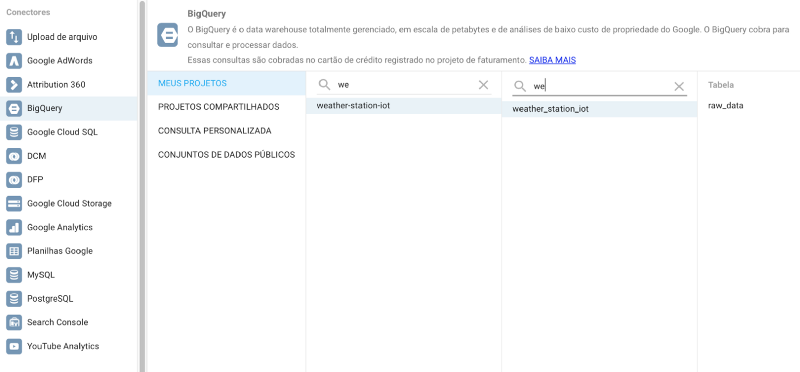
Data Studio BigQuery connector.
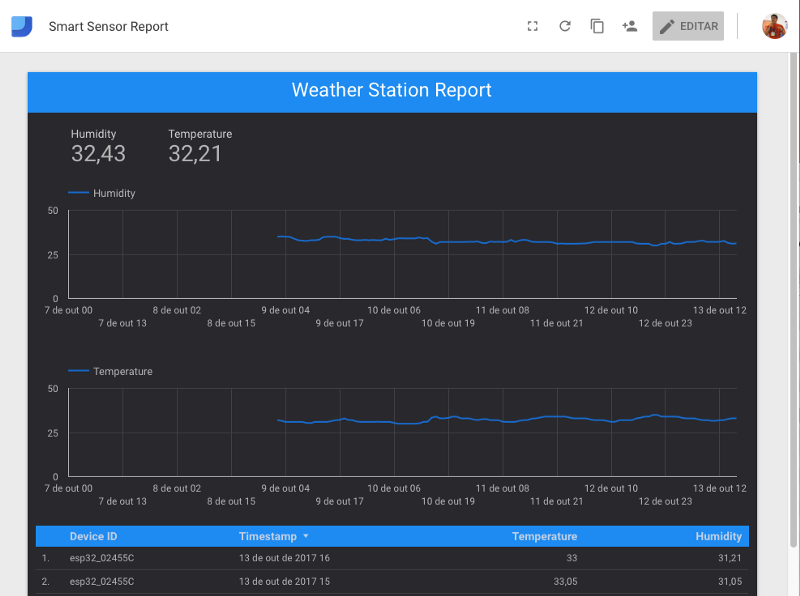
A simple report using Data Studio.
Further Reading
That’s it for this tutorial, hope that you got interested in Google Cloud IoT Core, it’s an awesome service that you can do powerful things with it. The post got a little bit longer than I expected, but I believe that gives a great overview of a lot of tools on Google Cloud Platform.
The code for this project can be found on my Github and some interesting are linked in the section bellow to read later:
References
- https://cloudplatform.googleblog.com/2017/09/announcing-Cloud-IoT-Core-public-beta.html
- http://mongoose-os.com/gcp
- https://cloud.google.com/iot/docs/quickstart
- https://mongoose-os.com/docs/libraries/cloud_integrations/gcp.html
- https://www.adafruit.com/product/3606
- https://github.com/alvarowolfx/weather-station-gcp-mongoose-os